0. 학습 목표
React is a JavaScript library for rendering user interfaces (UI).
In this chapter, you'll learn to create, customize, and conditionally dispaly React components.
1. Your First Component(subtitle: How to wirte your first React component)
학습 목표
1.1 What a component is (컴포넌트가 무엇인지)
1.2 What role components play in a React application (리액트 앱에서 컴포넌트는 어떤 역할을 하는지)
1.3 How to write your first React component (리액트 컴포넌트 작성하는 방법)
Components: UI buiding block (UI 구성요소)
React lets you combine your markup, CSS, and JavaScript into custom “components”, reusable UI elements for your app. Just like with HTML tags, you can compose, order and nest components to design whole pages.
Defining a component
React component is a JavaScript function that you can sprinkle with markup. Here’s what that looks like.
export default function Profile() {
  return (
    <img
      src="https://i.imgur.com/MK3eW3Am.jpg"
      alt="Katherine Johnson"
    />
  )
}
And here’s how to build a component:
Step1: Export the component (epport default prefix is a standard Javascript Syntax , It lets you mark the main function in a file so that you can later import it from other files.)
Step2: Define the function (With function Profile() { } you define a JavaScript function with the name Profile)
Step3: Add markup (What is returned looks like HTML, but is actually JavaScript. This syntax is called JSX, and it lets you embed markup inside JavaScript. Return statements can be written all on one line. But if your markup isn’t all on the same line as the return keyword, you must wrap it in a pair of parentheses)
Using a component
Now that you’ve defined your Profile component, you can nest it inside other components. For example, you can export a Gallery component that uses multiple Profile components.
function Profile () {
  return (
    <img
      src="https://i.imgur.com/MK3eW3As.jpg"
      alt="Katherine Johnson"
    />
  );
}

export default function Gallery() {
  return (
    <section>
      <h1>Amazing Scientists</h1>
      <Profile />
      <Profile />
      <Profile />
    </section>
  );
}
Because the Profile components are rendered inside Gallery—even several times!—we can say that Gallery is a parent component, rendering each Profile as a “child”.
🚨 Note
- Components can render other components, but you must never nest their definitions.
export default function Gallery() {
  // 🔴 Never define a component inside another component!
  function Profile() {
    // ...
  }
  // ...
}
📚 Summary
- React lets you create components, reusable UI elements for your app.
- In a React app, every piece of UI is a component.
- React components are regular JavaScript functions except: (1. Their names always begin with a capital letter. 2. They return JSX markup)
🎯 Challenges
// 1
export default function Profile() {
  return (
    <img
      src="https://i.imgur.com/lICfvbD.jpg"
      alt="Aklilu Lemma"
    />
  );
}


// 2
export default function Profile() {
  return <img src="https://i.imgur.com/jA8hHMpm.jpg" alt="Katsuko Saruhashi" />;
}


// 3
function Profile() {
  return (
    <img
      src="https://i.imgur.com/QIrZWGIs.jpg"
      alt="Alan L. Hart"
    />
  );
}

export default function Gallery() {
  return (
    <section>
      <h1>Amazing scientists</h1>
      <Profile />
      <Profile />
      <Profile />
    </section>
  );
}

// 4
export default function Congratulations() {
  return <h1>Good job!</h1>
}
2. Importing and Exporting Components (subtitle: When and how to create multi-components files)
You can declare many components in one file, but large files can get difficult to navigate. To solve this, you can export a component into its own file, and then import that component from another file.
학습 목표
2.1 What a root component file is (루트 컴포넌트란 무엇인지)
2.2 How to import and export a component (컴포넌트를 import하고 export 하는 방법)
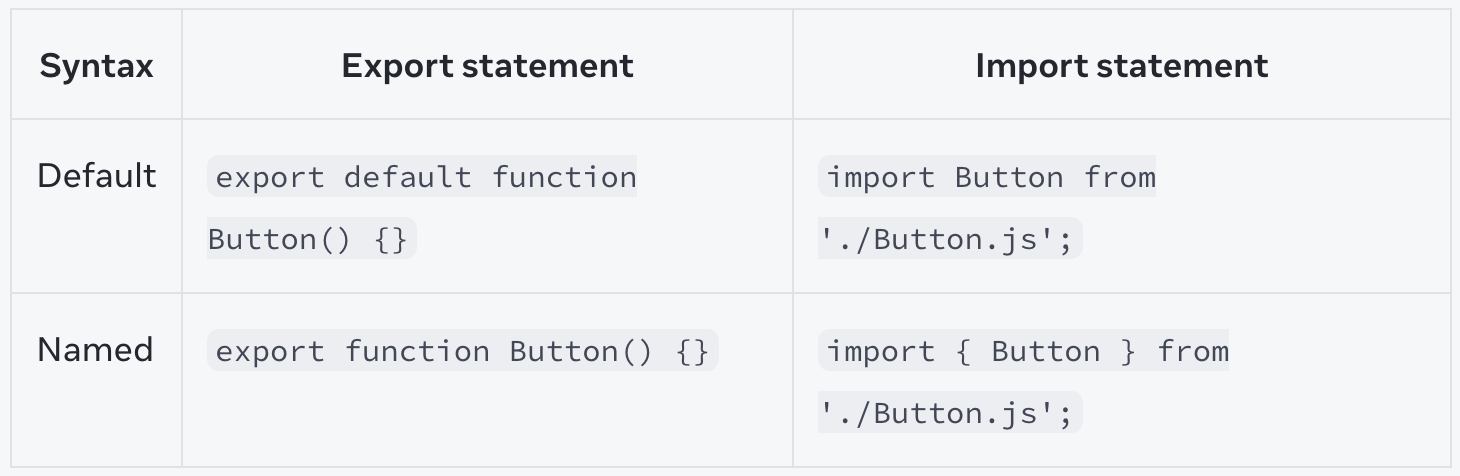
2.3 When to use default and named imports and exports (default 및 이름 있는 imports와 exports는 언제 사용하는지)
2.4 How to import and export multiple components from one file (하나의 파일에서 다양한 컴포넌트를 import 하고 export 하는 방법)
2.5 How to split components into multiple files (컴포넌트를 여러 파일로 분리하는 방법)
The Root Component file
These currently live in a root component file, named App.js in this example.
// App.js

function Profile () {
  return (
    <img
      src="https://i.imgur.com/MK3eW3As.jpg"
      alt="Katherine Johnson"
    />
  );
}

export default function Gallery() {
  return (
    <section>
      <h1>Amazing Scientists</h1>
      <Profile />
      <Profile />
      <Profile />
    </section>
  );
}
Depending on your setup, your root component could be in another file, though. If you use a framework with file-based routing, such as Next.js, your root component will be different for every page.
Exporting and importing a component
1. Make a new JS file to put the components in.
2. Export your function component from that file (using either default or named exports)
3. Import it in the file where you'll use the component.
import Gallery from './Gallery.js';

export default function App() {
  return (
    <Gallery />
  );
}
Exporting and importing multiple components from the same file
A file can only have one default export, but it can have numerous named exports.
1. First, export Profile from Gallery.js using a named export (no default keyword).
export function Profile() {
  // ...
}
2. Then, import Profile from Gallery.js to App.js using a named import (with the curly braces).
import { Profile } from './Gallery.js';
3. Finally, render <Profile /> from the App component.
export default function App() {
  return <Profile />;
}
Now, Gallery.js contains two exports: a default Gallery export, and a named Profile export.
// App.js
import Gallery from './Gallery.js';

export default function App() {
  return (
    <div>
      <Gallery />
    </div>
  );
}

// Gallery.js
import Profile from "./Profile.js"

export default function Gallery() {
  return (
    <section>
      <h1>Amazing scientists</h1>
      <Profile />
      <Profile />
      <Profile />
    </section>
  );
}


// Profile.js
export default function Profile() {
  return (
    <img
      src="https://i.imgur.com/QIrZWGIs.jpg"
      alt="Alan L. Hart"
    />
  );
}
3. Writing markup with JSX (subtitle: How to add markup to JavaScript with JSX)
JSX is a syntax extension for JavaScript that lets you write HTML-like markup inside a JavaScript file.
학습 목표
3.1 Why React mixes markup with rendering logic (리액트가 렌더링 로직과 마크업을 함께 사용하는 이유)
2.2 How JSX is different from HTML (JSX가 HMTL과 어떻게 다른지)
2.3 How to display information with JSX (JSX와 함께 어떻게 정보를 표시하는지)
JSX: Putting markup into JavaScript
The Web became more interactive, logic increasingly determined content. JavaScript was in charge of the HTML! This is why in React, rendering logic and markup live together in the same place—components.
The Rules of JSX
1. Return a single root element
To return multiple elements from a component, wrap them with a single parent tag.
If you don’t want to add an extra <div> to your markup, you can write <> and </> instead. This empty tag is called a Fragment. Fragments let you group things without leaving any trace in the browser HTML tree.
2. Close all the tags
JSX requires tags to be explicitly closed: self-closing tags like <img> must become <img />, and wrapping tags like <li>oranges must be written as <li>oranges</li>.
3. camelCase all most of the things
But JavaScript has limitations on variable names. For example, their names can’t contain dashes or be reserved words like class. This is why, in React, many HTML and SVG attributes are written in camelCase. For example, instead of stroke-width you use strokeWidth. Since class is a reserved word, in React you write className instead.
📚 Summary
Now you know why JSX exists and how to use it in components:
- React components group rendering logic together with markup because they are related.
- JSX is simmilar to HTML, with a few differences. You can use a converer if you need to.
- Error messages will often point you in the right direction to fixing your markup.
4. JavaScript in JSX with Curly Braces(subtitle: How to use curly braces with JSX to access JavaScript functionality from your components)
JSX lets you write HTML-like markup inside a JavaScript file, keeping rendering logic and content in the same place. Sometimes you will wnat to add a little JavaScript logic or reference a dynamic property inside that markup. In this situation, you can use curly braces in your JSX to open a window to JavaScript.
학습 목표
4.1 How to pass strings with quotes (따옴표로 문자열을 전달하는 방법)
4.2 How to reference a JavaScript variable inside JSX with curly braces (중괄호를 사용하여 JSX 내에서 JavaScript 변수를 참조하는 방법)
4.3 How to call a JavaScript function inside JSX with curly braces (중괄호를 사용하여 JSX 내에서 JavaScript 함수를 호출하는 방법)
4.4 How to use a JavaScript object inside JSX with curly braces (중괄호를 사용하여 JSX 내에서 JavaScript 객체를 사용하는 방법)
Passing strings with quotes
When you want to pass a string attribute to JSX, you put it in single or double quotes.
// App.js
export default function Avatar() {
  return (
    <img
      className="avatar"
      src="https://i.imgur.com/7vQD0fPs.jpg"
      alt="Gregorio Y. Zara"
    />
  )
}
But what if you want to dynamically specify the src or alt text? You could use a value from JavaScript by replacing " and " with { and } .
export default function Avatar() {
  const avatar = 'https://i.imgur.com/7vQD0fPs.jpg';
  const description: 'Gregorio Y. Zara';
  return (
    <img
      className="avatar"
      src={avatar}
      alt={description}
    />
  )
}
Curly braces let you work with JavaScript right there in your markup.
Using curly braces: A window into the JavaScript world
Any JavaScript expression will work between curly braces, including functino calls like formDate( )
const todya = new Date();

function formDate(date) {
  return new Intl.DateTiemFormat(
    'en-US',
    { weekday: 'logn' },
  ).format(date);
}

export default function TodoList() {
  return (
    <h1>To Do List for {formatDate(today)}</h1>
  );
}
Using "double curlies": CSS and other objects in JSX
In addition to strings, numbers, and other JavaScript expressions, you can even pass objects in JSX. Objects are also denoted with curly braces, like { name: "Hedy Lamarr", inventions: 5 }. Therefore, to pass a JS object in JSX, you must wrap the object in another pair of curly braces: person={{ name: "Hedy Lamarr", inventions: 5 }}.
You may see this with inline CSS styles in JSX. React does not require you to use inline styles (CSS classes work great for most cases). But when you need an inline style, you pass an object to the style attribute:
export default function TodoList() {
  return (
    <ul style={{
      backgroundColor: 'black',
      color: 'pink'
    }}>
      <li>Improve the videophone</li>
      <li>Prepare aeronautics lectures</li>
      <li>Work on the alcohol-fuelled engine</li>
    </ul>
  );
}
📚 Summary
- JSX attributes inside quotes are passed as strings.
- Curly braces let you bring JavaScript logic and varibales into your markup.
- They work inside the JSX tag content or immediately after = in attributes. (중괄호는 JSX 태그 콘텐츠 내부 또는 속성의 = 바로 뒤에서 작동합니다.)
- {{ and }} is not special syntax: it's a JavaScript object tucked inside JSX curly braces. (JSX 중과호 안에 들어있는 JavaScript 객체입니다)
5. Passing Props to a Component (subtitle: How to configure components with props)
React components use props to communicate with each other. Every parent component can pass some information to its child components by giving them props. Props might remind you of HTML attributes, but you can pass any JavaScript value through them, including objects, arrays, and functions.
학습 목표
5.1 How to pass props to a component (컴포넌트에 props를 전달하는 방법)
5.2 How to read props from a component (컴포넌트에 props를 읽는 방법)
5.3 How to specify default values for props (props의 기본값을 지정하는 방법)
5.4 how to pass some JSX to a component (컴포넌트에 JSX를 전달하는 방법)
5.5 How props change over time (시간에 따라 props가 변하는 방식)
Familiar props
Props are the information that you pass to a JSX tag. For example, className, src, alt, width, and height are some of the props you can pass to an <img>
Passing props to a component
Step 1: Pass props to the child component
First, pass some props to Avatar. For example, let's pass two props: person(an object), and size(a number)
export default function Profile() {
  return (
    <Avatar
      person={{ name: "'Lin Lanying", imageId: "1bX5QH6 }}
      size={100}
    />
  )
}
Now you can read these props inside the Avatar component.
Step 2: Read props inside the child component
You can read these props by listing their names person, size sepearated by the commas inside ({ and }) directly after function Avatar. (이러한 props들은 function Avatar 바로 뒤에 있는 ({와 }) 안에 그들의 이름인 person, size 등을 쉼표로 구분함으로써 읽을 수 있습니다) This lets you use them inside the Avatar code, like you would with a varaible.
import { getImageUrl } from './utils.js';

function Avatar({ person, size }) {
  return (
    <img
      className="avatar"
      src={getImageUrl(person)}
      alt={person.name}
      width={size}
      height={size}
    />
  );
}

export default function Profile() {
  return (
    <div>
      <Avatar
        size={100}
        person={{
          name: 'Katsuko Saruhashi',
          imageId: 'YfeOqp2'
        }}
      />
      <Avatar
        size={80}
        person={{
          name: 'Aklilu Lemma',
          imageId: 'OKS67lh'
        }}
      />
      <Avatar
        size={50}
        person={{
          name: 'Lin Lanying',
          imageId: '1bX5QH6'
        }}
      />
    </div>
  );
}
They serve the same role as arguments serve for functions—in fact, props are the only argument to your component! React component functions accept a single argument, a props object. Usually you don’t need the whole props object itself, so you destructure it into individual props.
Specifying a default value for a prop
If you want to give a prop a default value to fall back on when no value is specified, you can do it with the destructuring by putting = and the default value right after the parameter.
function Avatar({ person, size = 100 }) {
  // ...
}
The default value is only used if the size prop is missing or if you pass size={undefined}. But if you pass size={null} or size={0}, the default value wii not be used.
Forwarding props with the JSX spread syntax
function Profile({ person, size, isSepia, thickBorder }) {
  return (
    <div className="card">
      <Avatar
        person={person}
        size={size}
        isSepia={isSepia}
        thickBorder={thickBorder}
      />
    </div>
  );
}
Profile component don't use any of their props directly, it can make sense to use a more concise "spread" syntax.
function Profile(props) {
  return (
    <div className="card">
      <Avatar {...props} />
    </div>
  );
}
This forward all of Profile's props to the Avatar withou listing each of their names.
Passing JSX as children
Sometimes you’ll want to nest your own components the same way.
When you nest content inside a JSX tag, the parent component will receive that content in a prop called children. For example, the Card component below will receive a children prop set to <Avatar /> and render it in a wrapper div.
import Avatar from './Avatar.js';

function Card({ children }) {
  return (
    <div className="card">
      {children}
    </div>
  );
}

export default function Profile() {
  return (
    <Card>
      <Avatar
        size={100}
        person={{
          name: 'Katsuko Saruhashi',
          imageId: 'YfeOqp2'
        }}
      />
    </Card>
  );
}
🚨 Attention
- Props are not always static. (Props는 항상 고정되어 있지 않습니다)
- However, props are immutable—a term from computer science meaning “unchangeable”. When a component needs to change its props (for example, in response to a user interaction or new data), it will have to “ask” its parent component to pass it different props—a new object! Its old props will then be cast aside, and eventually the JavaScript engine will reclaim the memory taken by them. (그러면 이전의 props는 버려지고(참조를 끊는다), 결국 JavaScript 엔진은 기존 props 가 차지했던 메모리를 회수 (가비지 컬렉팅, GC)하게 됩니다.)
- Don’t try to “change props”.
📚 Summary
- To pass props, add them to the JSX, just like you would with HTML attributes.
- To read props, use the function Avatar ({ person, size }) destructuring syntax.
- You can specify a default value like size = 100, which is used for missing and undefined props.
- You can forward all props with <Avatar {...props} /> JSX spread syntax, but don't overuse it.
- Nested JSX like <Card><Avatar /></Card> will appear as Card component's children prop.
- Props are read-only snapshots in time: every render recieves a new version of props.
- You can't change props. When you need interactivity, you'll need to set state.
6. Conditional Rendering (subtitle: How to conditionally render components)
Your components will often need to display different things depending on different conditions. In React, you can conditionally render JSX using JavaScript syntax like if statements, &&, and ? : operators.
학습 목표
6.1 How to return different JSX depending on a condition (조건에 따른 다른 JSX를 반환하는 방법)
6.2 How to conditionally include or exclude a piece of JSX (일부 JSX를 조건부로 포함하거나 제외하는 방법)
6.3 Common conditional syntax shortcuts you'll encounter in React codebases (React 코드베이스에서 흔히 접할 수 있는 조건부 구문 단축 표현)
Conditionally returning JSX
function Item({ name, isPacked }) {
  if (isPacked) {
    return <li className="item">{name} ✔</li>;
  }
  return <li className="item">{name}</li>;
}

export default function PackingList() {
  return (
    <section>
      <h1>Sally Ride's Packing List</h1>
      <ul>
        <Item
          isPacked={true}
          name="Space suit"
        />
        <Item
          isPacked={true}
          name="Helmet with a golden leaf"
        />
        <Item
          isPacked={false}
          name="Photo of Tam"
        />
      </ul>
    </section>
  );
}
Notice how you’re creating branching logic with JavaScript’s if and return statements. In React, control flow (like conditions) is handled by JavaScript.
Conditionally returning nothing with null
In some situations, you won’t want to render anything at all. For example, say you don’t want to show packed items at all. A component must return something. In this case, you can return null.
function Item({ name, isPacked }) {
  if (isPacked) {
    return null;
  }
  return <li className="item">{name}</li>;
}

export default function PackingList() {
  return (
    <section>
      <h1>Sally Ride's Packing List</h1>
      <ul>
        <Item
          isPacked={true}
          name="Space suit"
        />
        <Item
          isPacked={true}
          name="Helmet with a golden leaf"
        />
        <Item
          isPacked={false}
          name="Photo of Tam"
        />
      </ul>
    </section>
  );
}
If isPacked is true, the component will return nothing, null. Otherwise, it will return JSX to render.
Conditionally including JSX
- Conditional (ternary) operator ( ? : )
return (
  <li className="item">
    {isPacked ? name + ' ✔' : name}
  </li>
);
This style works well for simple conditions, but use it in moderation.(적당히 사용하세요) If your components get messy with too much nested conditional markup, consider extracting child components to clean things up. In React, markup is a part of your code, so you can use tools like variables and functions to tidy up complex expressions.
- Logical AND operator ( && )
Another common shortcut you’ll encounter is the JavaScript logical AND (&&) operator. Inside React components, it often comes up when you want to render some JSX when the condition is true, or render nothing otherwise. (React 컴포넌트 내에서 조건이 참일 때 일부 JSX를 렌더링하거나 그렇지 않으면 아무것도 렌더링하지 않으려 할 때 자주 사용됩니다) With &&, you could conditionally render the checkmark only if isPacked is true:
return (
  <li className="item">
    {name} {isPacked && '✔'}
  </li>
);
Conditionally assigning JSX to a variable
function Item({ name, isPacked }) {
  let itemContent = name;
  if (isPacked) {
    itemContent = name + " ✔";
  }
  return (
    <li className="item">
      {itemContent}
    </li>
  );
}

export default function PackingList() {
  return (
    <section>
      <h1>Sally Ride's Packing List</h1>
      <ul>
        <Item
          isPacked={true}
          name="Space suit"
        />
        <Item
          isPacked={true}
          name="Helmet with a golden leaf"
        />
        <Item
          isPacked={false}
          name="Photo of Tam"
        />
      </ul>
    </section>
  );
}
📚 Summary
- In React, you control branching logic(분기 로직) with JavaScript.
- You can return a JSX expression conditionally with an if statement.
- You can conditionally save some JSX to a variable and then include it inside other JSX by using the curly braces.
- In JSX, {cond ? <A /> : <B />} means “if cond, render <A />, otherwise <B />”.
- In JSX, {cond && <A />} means “if cond, render <A />, otherwise nothing”.
- The shortcuts are common, but you don’t have to use them if you prefer plain if.
7. Rendering Lists (subtitle: How to render multiple components at a time)
You will often want to display multiple similar components from a collection of data. You can use the JavaScript array methods to manipulate an array of data.
학습 목표
7.1 How to render components from an array using JavaScript’s map() (JavaScript의 map()을 사용하여 배열에서 컴포넌트를 렌더링 하는 방법)
7.2 How to render only specific components using JavaScript's filter() (JavaScript의 filter()를 사용하여 특정 컴포넌트만 렌더링 하는 방법)
7.3 When and why to use React keys (React에서 key를 사용하는 경우와 그 이유)
Rendering data from arrays
1. Move the data into an array
const people = [
  'Creola Katherine Johnson: mathematician',
  'Mario José Molina-Pasquel Henríquez: chemist',
  'Mohammad Abdus Salam: physicist',
  'Percy Lavon Julian: chemist',
  'Subrahmanyan Chandrasekhar: astrophysicist'
];
2. Map the people members into a new array of JSX nodes, listItems
const listItems = people.map(person => <li>{person}</li>);
3. Return listItems from your component wrapped in a <ul>
return <ul>{listItems}</ul>;
const people = [
  'Creola Katherine Johnson: mathematician',
  'Mario José Molina-Pasquel Henríquez: chemist',
  'Mohammad Abdus Salam: physicist',
  'Percy Lavon Julian: chemist',
  'Subrahmanyan Chandrasekhar: astrophysicist'
];

export default function List() {
  const listItems = people.map(person =>
    <li>{person}</li>
  );
  return <ul>{listItems}</ul>;
}
Filtering arrays of items
const people = [{
  id: 0,
  name: 'Creola Katherine Johnson',
  profession: 'mathematician',
}, {
  id: 1,
  name: 'Mario José Molina-Pasquel Henríquez',
  profession: 'chemist',
}, {
  id: 2,
  name: 'Mohammad Abdus Salam',
  profession: 'physicist',
}, {
  name: 'Percy Lavon Julian',
  profession: 'chemist',
}, {
  name: 'Subrahmanyan Chandrasekhar',
  profession: 'astrophysicist',
}];
1. Create a new array of just “chemist” people, chemists, by calling filter() on the people filtering by person.profession === 'chemist'
const chemists = people.filter(person =>
  person.profession === 'chemist'
);
2. Now map over chemists
const listItems = chemists.map(person =>
  <li>
     <img
       src={getImageUrl(person)}
       alt={person.name}
     />
     <p>
       <b>{person.name}:</b>
       {' ' + person.profession + ' '}
       known for {person.accomplishment}
     </p>
  </li>
);
3. Lastly, return the listItems from your component.
return <ul>{listItems}</ul>;
import { people } from './data.js';
import { getImageUrl } from './utils.js';

export default function List() {
  const chemists = people.filter(person =>
    person.profession === 'chemist'
  );
  const listItems = chemists.map(person =>
    <li>
      <img
        src={getImageUrl(person)}
        alt={person.name}
      />
      <p>
        <b>{person.name}:</b>
        {' ' + person.profession + ' '}
        known for {person.accomplishment}
      </p>
    </li>
  );
  return <ul>{listItems}</ul>;
}
🚨 Attention
- Arrow functions implicitly(암시적으로) return the expression right after =>, so you didn't need a return statement.
- However, you must write return explicitly(명시적으로) if your => is followed by a { curly brace.
Keepig list items in order with key (key 로 목록의 항목 순서 유지하기)
You need to give each array item a key — a string or a number that uniquely identifies it among other items in that array.
<li key={person.id}>...</li>
🚨 Note
- JSX elements directly inside a map() call always need keys!
Where to get your key
Rather than generating keys on the fly, you should include them in your data. (즉석에서 key를 생성하는 대신 데이터에 포함시켜야 합니다)
1. Data from a database: If your data is coming from a database, you can use the database keys/IDs, which are unique by nature.
2. Locally generated data: If your data is generated and persisted locally (e.g. notes in a note-taking app), use an incrementing counter, crypto.randomUUID() or a package like uuid when creating items.
Rules of keys
1. Keys must be unique among siblings. However, it’s okay to use the same keys for JSX nodes in different arrays.
2. Keys must not change or that defeats their purpose. (key가 변경되지 않아야 합니다. 그렇지 않으면 목적에 어긋나게 됩니다) Don’t generate them while rendering.
Why does React need keys?
They let us uniquely identify an item between its siblings.(key를 사용하면 형제 항목 사이에서 특정 항목을 고유하게 식별할 수 있습니다) A well-chosen key provides more information than the position within the array. Even if the position changes due to reordering, the key lets React identify the item throughout its lifetime. (만약 재정렬로 인해 어떤 항목의 위치가 변경되더라도, 해당 항목이 사라지지 않는 한, React는 key를 통해 그 항목을 식별할 수 있습니다)
8. Keeping Components Pure
학습 목표
8.1 What purity is and how it helps you avoid bugs (순수성이 무엇이고 그것이 버그를 방지하는데 어떻게 도움이 되는지)
8.2 How to keep comonents pure by keeping changes out of the render phase (렌더링 단계에서 변경 사항을 제외함으로써 컴포넌트를 순수하게 유지하는 방법)
8.3 How to use Strict Mod to find mistakes in your component (컴포넌트에서 실수를 찾기 위해 StrictMode를 사용하는 방법)
Purity: Components as formulass
9. Understanding Your UI as a Tree
React, and many other UI libraries, model UI as a tree. Thinking of your app as a tree is useful for understanding the relationship between components. This understanding will help you debug future concepts like performance and state management.
학습 목표
9.1 How React "sees" component structures (React가 컴포넌트 구조를 "보는" 방법)
9.2 What a render tree is and what it is useful for (렌더 트리란 무엇이며 어떤 용도로 유용한지)
9.3 What a module dependency tree is and what it is useful for (모듈 종속성 트리란 무엇이며 어떤 용도로 유용한지)
📚 Summary
- Trees are a common way to represent the relationship between entities. They are often used to model UI.
- Render trees represent the nested relationship between React components across a single render.
- With conditional rendering, the render tree may change across different renders. With different prop values, components may render different children components.
- Render trees help identify what the top-level and leaf components are. Top-level components affect the rendering performance of all components beneath them and leaf components are often re-rendered frequently. Identifying them is useful for understanding and debugging rendering performance.
- Dependency trees represent the module dependencies in a React app.
- Dependency trees are used by build tools to bundle the necessary code to ship an app.
- Dependency trees are useful for debugging large bundle sizes that slow time to paint and expose opportunities for optimizing what code is bundled.
'React > 공식문서(2023)' 카테고리의 다른 글
| [리액트 공식문서 2023] Adding Interactivity (0) | 2023.11.06 |
|---|
